Monday, June 27, 2016

Walking with Drones

Stirling Range, Western Australia.
Photo by Andy Dolphin.

I haven't painted for a while but have been kept busy with other things.

One of those things involves my son who purchased a drone last December. Since then he's been hunting for places to fly it and capture some of our amazing scenery in video and photos.

If you want to see our Great Southern region like you've never seen it before, you really should check out his Drone Video Youtube channel.

The reason I've been busy is because I've accompanied him on several of his trips from Denmark to Albany. For the last three weekends we've also completed a few of the walks in the Porongurup and Stirling ranges.

The first was Devils Slide, which at 650m above sea level is the highest peak in the Porongurup Range.

We took the track which starts near Waddy's Hut on the south side of the range. This is the shorter of two approaches, but it's also steeper. The first section of the walk follows the Wansborough Pass which is a track wide enough to drive a vehicle through. Although it is closed to public traffic, I assume it is still used for maintenance access by the ranger and for fire control when needed.

This track tested our resolve from the very start and reminded me how long it's been since I put my legs under any real pressure. I'm not the fittest person I know.

The end result, however, was worth the effort.

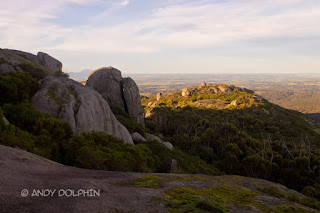
Devils Slide, Porongurup Range, WA. By Andy Dolphin.
Devils Slide, Porongurup Range.
Photo by Andy Dolphin.

The photo above shows the view from near the top of the Devils Slide walk. It is much more impressive than I'd previously thought. I'll be going back as often as time allows, as it only 15-20 minutes from home and I'd like to see it at different times of the day, in all seasons.

Yesterday we visited the Stirling Range and tackled the Talyuberlup walk trail. This is a fairly steep walk and had a few dodgy spots where the track has eroded over the years leaving large steps that pose a small challenge when you have short legs. Plus, there had been rain earlier in the dayso there was a bit of slippery mud to add a little interest. But we made it to the top, some 783m above sea level, and took in one the most spectacular views I have ever seen.

It's funny, no matter how much grumbling my legs, back, lungs and heart do on the way up, it all goes away the moment the interesting bit is reached. Suddenly the next climb, even when it's a near-vertical scramble up a rock-filled crevice, looks trivial compared to the far-less-interesting and energy-sucking track that leads up the side of the mountain.

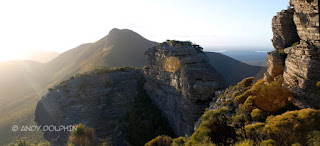
The Talyuberlup walk starts to get interesting about two-thirds of the way up, as the bush gives way to craggy rock formations.  The last section of the walk takes you around the cliffs that form the peak until finally turning up through a tunnel which requires arms and legs to conquer. The view from the north-facing exit to the tunnel can be seen below. This photo was shot with my DSLR, not with my son's drone.

Mt Mago from Mt Talyuberlup Peak, Stirling Range, WA. By Andy Dolphin.
Magog from Talyuberlup, Stirling Range.
Photo by Andy Dolphin.

Talyuberlup is sublime. I'm advised there are better views in the range, but I think this must be one the best views accessible to the average person not particularly skilled in bush walking and climbing.

I'm not sure where we're going next, but I think that view will take some beating.

When I'm fit enough to do it, I hope to take some paint and brushes up with me, and hopefully capture some of that magic in oils.

Friday, June 17, 2016

Procreate - iPad Plein Air: Anzac Memorial

Digital painting on iPad, Procreate. Anzac, Desert Mounted Corps Memorial Statue Albany.
Desert Mounted Corps Memorial Statue, Albany
iPad Digital Painting
© Andy Dolphin
 
Ever since getting my hands on Procreate, a very cheap "finger-painting" app for the iPad, I've wanted to sit down outdoors and have a go at digital plein air painting.

I've made a few attempts at it recently, with less-than-spectacular results, but on Wednesday afternoon I ventured up the steps to the Anzac Memorial atop Mt Clarence in Albany and sat myself down to do a painting I've long-wanted to do in oils, but never got around to.

The afternoon was bright and sunny with clear deep-blue skies. It was exactly the sort of light I enjoy painting in because it delivers sharp contrasts on the subject. It works especially well with statues, a subject I've largely ignored in my 17 years of painting, and can create a beautiful, natural notan effect.

Using a cheap pen-stylus I sketched on the iPad for just over an hour and produced something I was happy with.

In doing this, I discovered that painting on a glossy screen on a sunlit afternoon is no easy task. I had to keep turning away from the subject to cast a shadow across the iPad, and then tilt it in various directions to reduce the reflections. After applying a few strokes, I'd turn back toward the subject then repeat the process with each new piece of information. This was made more awkward by a bright white flag pole which had positioned itself rather inconveniently between me and the subject.


This painting could have been completed using only a finger as a brush, but I used a combination pen/stylus/torch which I got as a free gift with something I had mail-ordered. The pen features a soft "rubber" tip on one end to use as a substitute finger.

Touch screens like those used on the iPad, usually work by sensing tiny electrical impulses from the skin. In order to act as a substitute finger, a typical touch-screen stylus is made from materials that will conduct electrical charges from the hand to the writing tip.

There are better stylus options around than the one I've used here but, as with most things in life, you get what you pay for and the better ones cost real money which I'm not yet ready to spend.

Procreate offers the facility to work in layers so I begin with a rough outline which becomes the top layer for a while. Next I build areas of colour delineating light and shadow on a layer beneath the outline. With the tonal map roughed in, I hide the outline layer then build mid-tones and detail on two or three new layers above the tonal layer.

From here, there's a fair bit of back and forth, working in each layer adding and subtracting colour as needed to tidy up the outline and refine details.


The Procreate app usually records every brush stroke and saves a time-lapse video of the painting's progress, but I discovered with this painting that the video is lost if you shut the iPad down without first closing the image and returning to the Procreate gallery. As a result, I don't have anything to show except the final image and the layers I used to build it.

Hopefully this is the start of a new sketching routine for me. I think exercises like this could easily form the basis of a traditional painting.